
Bash Scripting & HPC Job Submission
Up until now, you have been typing commands directly into the terminal one by one. This is excellent for exploring data and learning the basics, but it is not sustainable for real bioinformatics workflows where analyses must be repeated across dozens or hundreds of samples.
Today, we will learn how to bundle our commands into reusable Bash scripts that execute automatically from start to finish. Then, we will explore how to take those scripts and submit them as jobs on a High-Performance Computing (HPC) cluster using Interactive sessions (srun / salloc) and the Slurm Workload Manager (sbatch). Finally, we will learn how to make our scripts flexible using Variables, Quoting, and User Input.
Part 1: Fundamentals of Bash Scripting
What is a Bash Script?
A Bash script is simply a plain text file containing a sequence of Linux commands.
File Extension: By convention, Bash scripts end with the
.shfile extension (for example,myscript.shorpipeline.sh). While Linux does not strictly require file extensions, using.shimmediately signals to you and your collaborators that the file is a shell script.Creating a Script: You can create and edit a script using any terminal text editor, such as
nano:nano myscript.sh
A script acts as an automated recipe. When executed, the computer reads the file line-by-line from top to bottom and runs each command in order, exactly as if you were typing them into the terminal yourself. This guarantees reproducibility which is a fundamental requirement in scientific research.
Anatomy & Structure of a Bash Script
Every well-written Bash script follows a clear structure composed of core components:
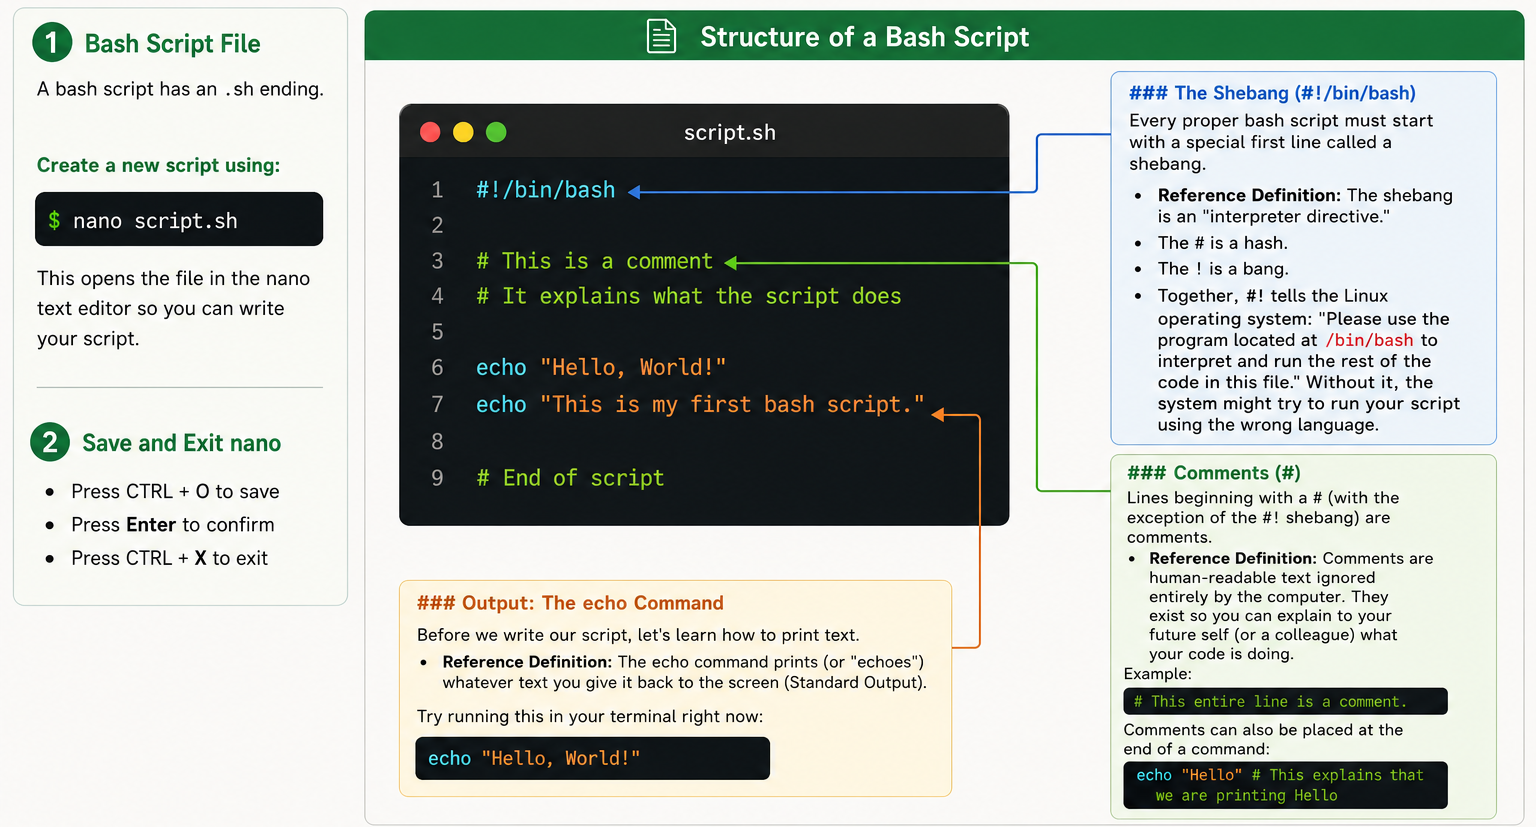
Writing and Running Your First Script
Let’s build your very first standalone script!
Open a new file called
first_script.shusingnano:nano first_script.shType the following lines into the file:
#!/bin/bash

# ---description----
# This is a welcome script to practice script execution
# Usage: bash first_script.sh

echo "========================================="
echo "Welcome to the ABI Summer School 2026!"
echo "This is my very first bash script."
echo "========================================="
Save and exit
nano(Ctrl+O,Enter,Ctrl+X).
How to Run a Bash Script
There are three different methods to execute your script:
Method 1: Passing the file to bash directly You can explicitly tell the bash program to read and execute your script:
bash first_script.shMethod 2: Passing the file to sh
sh is an older standard shell interpreter. For basic commands, it behaves similarly:
sh first_script.shMethod 3: Executing the file directly In professional environments, we run scripts directly as standalone programs using ./ (which specifies “look in the current directory”):
./first_script.shWait! You will see an error: Permission denied!
Why did this happen? By default, Linux creates new text files with read and write permissions only. To prevent malicious or accidental execution, Linux requires you to explicitly grant executable permissions to any file you wish to run directly.
The chmod Command
chmodstands for “Change Mode”. It modifies file access permissions. The+xflag tells Linux to add executable rights to the file.
chmod +x first_script.shNow, try running Method 3 again:
./first_script.shIt works! When executed this way, the operating system inspects the #!/bin/bash shebang on line 1, loads the Bash interpreter, and executes your instructions.
Part 2: Running Computations on the HPC
HPC Cluster Architecture: Login Node vs. Compute Nodes
When you log into a High-Performance Computing (HPC) cluster, you land on a Login Node.
The Login Node: A shared gateway server used by dozens of researchers at once. It is intended only for lightweight tasks: navigating directories, editing code with
nano, and submitting jobs. Never run computationally heavy analyses on the login node, as doing so will slow down or crash the server for all users.The Compute Nodes: A massive fleet of high-powered servers (equipped with dozens of CPU cores and hundreds of gigabytes of RAM) where the actual computation takes place. Compute nodes cannot be accessed directly; tasks must be routed to them via a workload manager.
Three Ways to Execute Work on an HPC
There are three primary ways to run workloads on compute nodes:
┌─────────────────────────────────────────────────────────────────────────────────────────┐
│                                HOW WORK RUNS ON AN HPC                                  │
├───────────────────────────────┬───────────────────────────────┬─────────────────────────┤
│    1. DIRECT INTERACTIVE      │    2. ALLOCATION SUBSHELL     │      3. BATCH JOBS      │
│            (srun)             │           (salloc)            │        (sbatch)         │
├───────────────────────────────┼───────────────────────────────┼─────────────────────────┤
│ • Connects directly to node   │ • Reserves resources first    │ • Runs in background    │
│ • Live interactive shell      │ • Subshell on login node      │ • Fully automated       │
│ • Good for testing & EDA      │ • Good for multiple tasks     │ • Good for heavy runs   │
│ • Command: srun --pty bash    │ • Command: salloc ...         │ • Command: sbatch ...   │
└───────────────────────────────┴───────────────────────────────┴─────────────────────────┘
1. Interactive Jobs (srun)
An interactive job allocates dedicated resources on a compute node and immediately gives you a live command prompt on that node in real time.
When to use: Testing short commands, debugging scripts, or exploring data interactively.
Quick interactive session:
srun --pty bashCustom resource request (e.g. 1 CPU core, 2GB RAM for 30 minutes):
srun --nodes=1 --ntasks=1 --cpus-per-task=1 --mem=2G --time=00:30:00 --pty bash(Notice how your prompt changes from
user@login-nodetouser@compute-node! When finished, simply typeexitto return to the login node).
2. Interactive Resource Allocation (salloc)
While srun immediately runs a command on a compute node, salloc is used to reserve and allocate resources first. It opens a subshell with those resources held for you.
When to use: When you need to hold a resource reservation for a work session and run several separate commands or
sruntasks within that same allocation.Example command (requesting 1 node, 2 CPUs, 4GB RAM for 1 hour):
salloc --nodes=1 --cpus-per-task=2 --mem=4G --time=01:00:00Once Slurm grants the allocation (
salloc: Granted job allocation ...), you can run tasks inside it usingsrun:srun hostnameReleasing resources: When finished, type
exitto terminate the allocation and release the resources back to the cluster:exit
3. Batch Jobs (sbatch)
A batch job is non-interactive. You write your instructions into a script, submit it to the scheduler, and disconnect. The cluster runs the script automatically in the background and saves all output to log files.
- When to use: Long-running computations, bioinformatics pipelines, and heavy analyses.
What is Slurm?
- Slurm (Simple Linux Utility for Resource Management) is an open-source Job Scheduler and Workload Manager. It tracks cluster resources, manages user queues, and assigns batch jobs to available compute nodes.
Slurm #SBATCH Directives
To tell Slurm what computational resources your script requires, we place #SBATCH headers at the top of the file immediately below the shebang.
| Flag | Purpose | Example |
|---|---|---|
--job-name |
A descriptive name for the job in the queue | #SBATCH --job-name=my_job |
--output |
File where standard output is saved | #SBATCH --output=my_job.out |
--error |
File where error messages are saved | #SBATCH --error=my_job.err |
--time |
Maximum runtime limit (HH:MM:SS) |
#SBATCH --time=00:05:00 |
--mem |
Total RAM requested | #SBATCH --mem=1G |
--cpus-per-task |
Number of CPU cores requested | #SBATCH --cpus-per-task=1 |
Practical: Submitting Your First Slurm Batch Job
Create a job submission script called
hello_slurm.sh:nano hello_slurm.shType the following code:
#!/bin/bash
#SBATCH --job-name=hello_slurm       # Name of the job in the queue
#SBATCH --output=hello_slurm.out     # Standard output log file
#SBATCH --error=hello_slurm.err      # Standard error log file
#SBATCH --time=00:05:00              # Maximum time requested (5 minutes)
#SBATCH --mem=1G                     # Total RAM requested (1 GB)
#SBATCH --cpus-per-task=1            # Number of CPU cores

# --- Basic Commands ---
echo "========================================="
echo "Hello from the HPC cluster!"
echo "Current working directory:"
pwd
echo "Current date and time:"
date
echo "Compute node hostname:"
hostname
echo "========================================="

# Pause for 30 seconds so we can observe the job in the queue
sleep 30

echo "Batch job completed successfully!"
Save and exit
nano(Ctrl+O,Enter,Ctrl+X).
Submitting and Monitoring the Job
Submit the job to Slurm:
sbatch hello_slurm.shSlurm will confirm with a job number, e.g.:
Submitted batch job 104523.Inspect the queue: Check the status of your running job (replace
<your_username>with your cluster username):squeue -u <your_username>ST(State):PD= Pending,R= Running,CG= Completing.
View the generated output log: Once the job finishes, check the generated output file:
cat hello_slurm.out
Practical 3: Diagnosing Broken Jobs & Using Error Logs
In bioinformatics, jobs frequently fail due to typos or missing files. Knowing how to read log files is essential.
Create a script with a deliberate typo:
nano broken_job.shType the following code:
#!/bin/bash
#SBATCH --job-name=broken_test
#SBATCH --output=broken_test.out
#SBATCH --error=broken_test.err
#SBATCH --time=00:02:00
#SBATCH --mem=1G

echo "Starting my analysis..."

# This command will fail because the folder does not exist:
ls /non_existent_directory/data/

echo "Analysis finished."
Save, exit, and submit:
sbatch broken_job.shCheck the error log:
cat broken_test.errYou will see the exact cause of failure:
ls: cannot access '/non_existent_directory/data/': No such file or directory.
Whenever a Slurm job fails or produces unexpected results, always inspect your .err file first (cat broken_test.err)!
Practical 4: Cancelling Active Jobs (scancel)
If you submit a job and realize you made a mistake, you can cancel it immediately to free up cluster resources:
Submit a job:
sbatch hello_slurm.shFind the
JOBIDin the queue:squeue -u <your_username>Cancel the job:
scancel <YOUR_JOB_ID>
Part 3: Introduction to Variables, Quoting & User Input
Static scripts that only print fixed messages are of limited use. To build flexible data-analysis pipelines, our scripts must store data in variables, handle spaces with proper quoting, and accept dynamic user input. We will practice each technique step-by-step by creating dedicated scripts.
Step 1: Learning Variables & Access Syntax ($VAR vs. ${VAR})
- What is a Variable? A named storage container in the computer’s memory. You store data (like sample IDs, organisms, or file paths) inside the variable and recall it anywhere in your script.
- Assign values using the equals sign
=. - CRITICAL: There must be NO SPACES around the equals sign!
Correct:
SAMPLE="SAMPLE_001"Incorrect:
SAMPLE = "SAMPLE_001"(Bash will mistakenly interpretSAMPLEas a command!)
- To retrieve or evaluate the data stored inside a variable, prefix its name with a dollar sign
$VARor wrap it in curly braces${VAR}.
Why Curly Braces Matter: $VAR vs. ${VAR}
In simple standalone expressions, $VAR and ${VAR} produce the same result. However, when you need to attach text, letters, or suffixes directly to a variable without spaces, curly braces ${VAR} are mandatory to explicitly mark the boundary of the variable name.
# Example 1: Appending letters to a word
word="chocolate"

# CORRECT: Prints "foobar"
echo "${word}bar"

# FAILS: Bash looks for a non-existent variable named '$wordbar'
echo "$wordbar"
In bioinformatics workflows, this is essential when generating output file names:
# Example 2: Constructing bioinformatics file paths
SAMPLE="Pf_3D7_001"

# CORRECT: Constructs "Pf_3D7_001_aligned.bam"
echo "${SAMPLE}_aligned.bam"

# FAILS: Bash looks for an undefined variable named '$SAMPLE_aligned'!
echo "$SAMPLE_aligned.bam"
Practical Task:
Question: You are building an automated quality control pipeline. Write a script named init_qc.sh in the results/scripts/ directory. 1. Define a variable sample set to SAMPLE_003. 2. Using the curly brace syntax (${VAR}), construct two new variables: input_file (pointing to raw_data/SAMPLE_003.fastq) and output_dir (pointing to results/qc/SAMPLE_003_fastqc/). 3. Have the script print a status message showing the input file path and output directory path. 4. Use the output_dir variable to create the output directory using mkdir -p. Execute the script and verify the directory was created!
Open the script with
nano:nano init_qc.shType the following code:
#!/bin/bash
# Description: Initialize QC directories using dynamic variables

sample="SAMPLE_003"

# Construct paths using curly braces
input_file="../../raw_data/${sample}.fastq"
output_dir="../results/qc/${sample}_fastqc"

# Print status log
echo "========================================="
echo "Starting QC Analysis"
echo "Input File:  $input_file"
echo "Output Dest: $output_dir"
echo "========================================="

# Execute a command using the variable
mkdir -p $output_dir
echo "Successfully created $output_dir"
Save and exit
nano(Ctrl+O,Enter,Ctrl+X).Run the script and check your
results/qc/folder:bash init_qc.sh
Step 2: Quoting Variables - Double Quotes ("") vs. Single Quotes ('')
Bash is very particular about how it handles text spaces and variables. You must understand the difference between double quotes (""), single quotes (''), and no quotes.
Double Quotes
"": They group words together into a single string but allow variables to be expanded (translated into their actual values).Single Quotes
'': They treat everything inside them as literal text. Variables will not be expanded.
Practical:
Create and open a new script:
nano quotes_demo.shType the following code:
#!/bin/bash
# ---description----
# Demonstrating the difference between double and single quotes
# Usage: bash quotes_demo.sh

USER_NAME="Gloria"

# Double quotes allow variable expansion:
echo "With double quotes: Hello, $USER_NAME"   # Outputs: Hello, Gloria

# Single quotes prevent variable expansion (literal text):
echo 'With single quotes: Hello, $USER_NAME'   # Outputs: Hello, $USER_NAME
Save, exit
nano, and run:bash quotes_demo.sh
Always use Double Quotes "$VAR" when referencing variables in your commands and echo statements to ensure variables expand correctly and paths containing spaces do not break.
Step 3: Interactive User Input with read
Hard-coding sample names directly into your script means you have to edit the file every time you process a new sample. We can make scripts dynamic by asking the user for input at runtime.
The
readcommand pauses script execution, waits for the user to type something on their keyboard, and stores whatever was typed directly into a variable.The
-pFlag: Usingread -p "Prompt text: " VARIABLEdisplays an inline prompt message to the user before waiting for their response.
Practical:
Open a new script:
nano interactive_prompt.shType the following code:
#!/bin/bash
# ---description----
# Capturing dynamic user input with read
# Usage: bash interactive_prompt.sh

# Prompt the user for input interactively
read -p "Enter the sequencing platform (e.g. Illumina / Nanopore): " PLATFORM

echo "----------------------------------------"
echo "Platform selected:               $PLATFORM"
echo "----------------------------------------"
Save and exit
nano.Run the script and type in your sample details when prompted:
bash interactive_prompt.sh
Practical Task:
Question: Create a script called check_logs.sh in the results/scripts/ directory. 1. Use read -p to ask the user: ‘Enter a keyword to search the logs (e.g., ERROR, WARNING):’ and store it in a variable. 2. Use grep to search for that dynamically provided keyword inside the logs/pipeline.log file. 3. Pipe (|) the result to tail to show only the 5 most recent occurrences of that term. 4. Execute the script and test it by typing in ERROR when prompted!
Open a new script:
nano check_logs.shType the following code:
#!/bin/bash
# Description: Interactively search pipeline logs

# Prompt the user for a search term
read -p "Enter a keyword to search the logs (e.g., ERROR, WARNING): " KEYWORD

echo "----------------------------------------"
echo "Searching for '$KEYWORD' in logs/pipeline.log..."
echo "----------------------------------------"

# Run grep to find the keyword and pipe to tail
grep "$KEYWORD" logs/pipeline.log | tail -n 5
Save and exit
nano(Ctrl+O,Enter,Ctrl+X).Run the script and type
ERRORwhen prompted:bash check_logs.sh
Step 4: Local vs. Environment Variables
So far, the variables we have created are Local Variables. They only exist within the specific script or terminal session where they were created. If you run a script, any variables defined inside that script disappear as soon as the script finishes.
In contrast, Environment Variables are system-wide variables that are available to the shell and any child processes or scripts you run.
Viewing Environment Variables: You can see all active environment variables using the
envorprintenvcommands.Common Environment Variables:
Variable Description Example Output $USERThe username of the current user. rahul$HOMEThe path to the user’s home directory. /home/rahul$PWDPresent Working Directory. (Current working directory changes depending on where the user is in terminal.) /var/www/html$SHELLThe path to the current shell interpreter. /bin/bash$PATHDirectories searched for executable commands. /usr/bin:/bin$HOSTNAMEThe network name of the machine. web-server-01
Making a Variable Global with export
If you want a variable defined in your terminal to be accessible by a script you run, you must “promote” it to an environment variable using the export command.
Practical:
Open a new script:
nano env_demo.shType the following code:
#!/bin/bash
# ---description----
# Demonstrating environment variables
# Usage: bash env_demo.sh

echo "Hello $USER! Your home directory is $HOME."
echo "The custom project directory is: $MY_PROJECT"
Save and exit
nano.Define a local variable in your terminal and run the script:
MY_PROJECT="/data/malaria"
bash env_demo.sh
(Notice that
$MY_PROJECTis blank in the script’s output because the script cannot see your terminal’s local variables).Now, export the variable and run the script again:
export MY_PROJECT
bash env_demo.sh
(This time, the script successfully reads the variable because
exportmade it an environment variable!)
ABI Summer School 2026 · Week 1: Linux / HPC